Tuesday, June 6, 2023

Walk through of a bug in the Volume Shadow Copy driver - volsnap.sys

Background

An issue was detected with shadow copies when using Arsenal Image Mounter as part of an analysis of a disk image. Intensive debugging followed and after some time it was clear that the bug was in volsnap.sys and Arsenal Image Mounter had absolutely nothing to do about the issue. The main challenge during the investigation was that the issue could not be reliably reproduced, and only in rare cases until it was further narrowed down.

What

The bug in the Volume Shadow Copy driver is one that anyone dealing with shadow copies should be aware of. It is important because the bug will delete the shadow copies on the volume and during a system analysis this may affect your work if not detected. The bug has only been observed on Windows 11 in the current version 10.0.22621.1 of the driver. For completeness here is the full set of versions I have tested: 

The bug was reported to Microsoft on May 11 2023.

Have made a GitHub project at Volsnap Bug Content with some content to accompany this text. References to it are made where applicable.

Symptom

After bringing a volume online there are no shadow copies visible. The volume must be mounted writable. Two error messages are written to the event log and the volume shadow copies are deleted.

Error 1


Event ID: 15
Message: The shadow copies of volume E: were aborted because of insufficient paged heap.


Error 2


Event ID: 27
Message: The shadow copies of volume E: were aborted during detection because a critical control file could not be opened.


Both of the two example events have been exported to xml with all details included and are available as part of the content provided at Volsnap Bug Content. We will further down see how the exact (and slightly confusing) error messages are constructed.

Due to the non deterministic nature of the bug it seems to happen randomly when a volume is brought online. That means the bug may be triggered the first time a volume is mounted, or it may happen on any later re-mount of the volume. See the end for how to reproduce.

Workaround

When the target volume is natively connected and mounted there is no real workaround since the shadow copies on the volume will be invalidated on the source volume when the bug is triggered. However, users of Arsenal Image Mounter that are working with disk images can mount an image in write temporary mode. If the bug is triggered, the image can be dismounted and then remounted which will effectively reset the volume back to the original state.

Deep dive

During the initial phase when a volume with shadow copies is brought online, the volsnap!VspActivateSnapshots is called and volsnap!VspCreateSnapshotExtension function is called once for every shadow copy. One of the things this function is responsible for is to call the kernel to create the device such as \Device\HarddiskVolumeShadowCopy236. 

Relevant section seen in IDA:


Then it will create the symbolic link such as \GLOBAL??\HarddiskVolumeShadowCopy236.

Relevant section seen in IDA:


Following this in WinDbg I've verified both the kernel calls  nt!IoCreateDevice and nt!IoCreateSymbolicLink will succeed with NTSTATUS 0 (STATUS_SUCCESS).

Towards the end of volsnap!VspCreateSnapshotExtension the worker thread is started after calling volsnap!VspCreateWorkerThread which ultimately prepares all the low level stuff for the shadow copy to be fully working.

First error in ZwOpenFile

 # Child-SP          RetAddr           Call Site
00 ffff9e88`31efb940 fffff801`5f66c2d5 volsnap!VspBypassIoExtension+0xd6
01 ffff9e88`31efbac0 fffff801`5f697777 volsnap!VspBypassIoExtensionDisable+0x9
02 ffff9e88`31efbaf0 fffff801`5f670a8c volsnap!VspSetIgnorableBlocksInBitmapWorker+0x1b7
03 ffff9e88`31efbbb0 fffff801`59c0dc67 volsnap!VspWorkerThread+0xdc
04 ffff9e88`31efbbf0 fffff801`59e2e304 nt!PspSystemThreadStartup+0x57
05 ffff9e88`31efbc40 00000000`00000000 nt!KiStartSystemThread+0x34

The first error happen in volsnap!VspBypassIoExtension when calling nt!ZwOpenFile to create a handle to the \Device\HarddiskVolumeShadowCopy236 which result in rax=00000000c000000e. This is strange since I verified the GLOBAL directory has correctly been updated with the symbolic link at the time of this call. The bad NTSTATUS is handled in volsnap!VspSetIgnorableBlocksInBitmapWorker which prepares the content for the event log entry.


The root cause of this first error is unknown, however since the unaffected versions of volsnap.sys does not contain any of the three VspBypassIo* functions it might be a clue:
  • VspBypassIoCommon
  • VspBypassIoExtension
  • VspBypassIoExtensionDisable
Side note: 
In the absence of an error in volsnap!VspBypassIoExtension a call is made to volsnap!VspBypassIoCommon which essentially calls ZwFsControlFile using the same handle and control code 90448h. The control code 90448h resolves to this mysterious entry in ntifs.h of WDK for version 10.0.22621.0:


Due to this first error, a larger structure (VS_VOLUME_EXTENSION->VS_FILTER_EXTENSION ?) containing lots of details about the volume and shadow copies will be out of sync with regards to to the expected number of handles. This is what ultimately causes the second error.

Second error in ZwOpenFile

 # Child-SP          RetAddr           Call Site
00 ffff9e88`32f645d0 fffff801`5f67becc volsnap!VspOpenFilesAndValidateSnapshots+0x290
01 ffff9e88`32f646e0 fffff801`59c162c5 volsnap!VspAdjustBitmap+0x4cc
02 ffff9e88`32f64a00 fffff801`59c0dc67 nt!ExpWorkerThread+0x155
03 ffff9e88`32f64bf0 fffff801`59e2e304 nt!PspSystemThreadStartup+0x57
04 ffff9e88`32f64c40 00000000`00000000 nt!KiStartSystemThread+0x34

The second error happens in nt!ZwOpenFile inside volsnap!VspOpenFilesAndValidateSnapshots while trying to create a handle to shadow copy file such as;
\Device\HarddiskVolume47\System Volume Information\{9b623041-e719-11ed-8832-80fa5b5eb89e}{3808876b-c176-4e48-b7ae-04046e6cc752}

Now, this seems to be a consequence of a series of unfortunate events.

1.
After the first error is detected in volsnap!VspSetIgnorableBlocksInBitmapWorker a call is made to volsnap!VspDestroyAllSnapshots. Because of the nature of the first error, this call will fail.

2.
Because volsnap!VspDestroyAllSnapshots fails, the code takes a jump here;

Then jumps to:

This is the starting point for the stack of the thread for the second error as shown above.

3.
While in volsnap!VspOpenFilesAndValidateSnapshots and iterating the structure, calls are being done to nt!ObfReferenceObject on every shadow copy's object such as HarddiskVolumeShadowCopy36. Now, due to the first error the expected number of shadow copies are out of sync, and when there are more than 1 shadow copy the function will eventually try to associate multiple (shadow copy) files on the file system to the same object.  When this scenario is reached, the nt!ZwOpenFile fails with rax=00000000c0000034.

The specific error is eventually detected (though it seems too late) and the code reaches this location where the detail for the event log entry is prepared here:

PAGELK:00000001C003BF2F                 mov     rax, 0AD00011381h
4.
Then, the code ends up calling volsnap!VspDestroyAllSnapshots a second time when most of it is already in an awful state.

5.
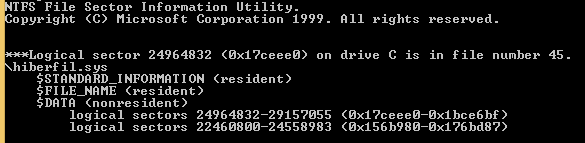
The combined result of all the above issues, is that volsnap!VspDestroyAllSnapshots will leave ghost shadow copy files on the file system that can't be deleted.


In the above screenshot the shadow copy master file and the oldest shadow copy has been deleted, leaving the nine most recent shadow copy files as hidden ghost files.

The only positive thing for the users in the scenario where the workaround is not possible, is that some of the data may be recoverable with some effort.

Decoding the event log entry details


Error 1

PAGELK:00000001C00477A3                 mov     rax, 5F0001211Ah
First we split up the 5F0001211A value into 5F-0001-211A and then we can can give the individual pieces some interpretation (decimal conversion and text mapping):
  • 5F = 95 (SourceTag)
  • 0001 = 1 (SourceFileID)
  • 211A = 8474 (SourceLine)
Here is the relevant section of the exported event:


The NTSTATUS value 0xC000000E (STATUS_NO_SUCH_DEVICE) which produces the error message "The shadow copies of volume E: were aborted because of insufficient paged heap." makes little sense here and is just confusing.

Error 2

PAGELK:00000001C003BF2F                 mov     rax, 0AD00011381h
We do the same and split AD00011381 into AD-0001-1381 and then we can give the individual pieces the following interpretation:
  • AD = 173 (SourceTag)
  • 0001 = 1 (SourceFileID)
  • 1381 = 4993 (SourceLine)
Here is the relevant section of the exported event:


The NTSTATUS 0xC0000034 (STATUS_OBJECT_NAME_NOT_FOUND) which produces the error message "The shadow copies of volume E: were aborted during detection because a critical control file could not be opened." makes some more sense here since a handle to the shadow copy file could not be created.

With this information you have some good hints on how to locate such event log error messages in the code disassembly.

Reproducing the bug

At Volsnap Bug Content a few handcrafted vhd's have been prepared with a minimal file system and shadow copies containing just small single files to keep it simple. Execute the included powershell script and pass arguments for the vhd file and vsc count. The script will enter a loop to mount and dismount the vhd. Eventually the bug will get triggered with the correct version of the driver and the script will stop when the vsc count has become unexpected.


Wednesday, August 23, 2017

RawCopy sending output on TCP securely

Fixed a few bugs in the TcpSend option of RawCopy, and thought it would be a good opportunity to explain how it can be used to send output securely.

The implementation of the TcpSend option is very basic. It merely open a tcp socket and send the data on the wire to the destination. Obviously this is not secure because the data is sent unencrypted in plaintext. Now there are a few options available for using that feature in a secure way. The following examples are all based on the assumption that you have a ssh server endpoint available. This way we can transfer the files securely through a SSH tunnel.


In all examples we use local port 6666 and remote port 7777 at the tunnel endpoints. That is, we use port 6666 on the RawCopy part and port 7777 on the remote netcat (or similar) part. For RawCopy we will thus use a command like this;


The remote netcat command would then be something like this;
nc -l -p 7777 >logfile.bin

For the creation of the encrypted tunnel:

Putty

Configure a regular ssh connection and specify local and remote destination in the tunnel options like this;

Now there's not yet any listening end, so open netcat inside the putty shell to receive the file from rawcopy;


Plink

This is the command line equivalent of putty that. Logic is still the same. Create the tunnel by plink command like this;


And use netcat in the shell as with putty.

OpenSSH

We will use the ssh client of Microsoft's Win32-OpenSSH, which is a fork of OpenSSH. This time we will nest all commands together in one command so that it could be suited for scripting. In short we will add the remote netcat command into the ssh command like this;


That would be much better with automation.

Saturday, August 19, 2017

Detection of filesystem patterns in encrypted containers

As part of the latest journey into VeraCrypt, I noticed a few characteristics of the containers with modified volumes. The tests performed here are done with VeraCrypt 1.22 on Windows using default settings, but applies equally well to Linux. In order to spot these charateristics, you need to have at least 2 different samples of the container to analyze. If you don't have more than 1 sample, then you might not be able to observe these characteristics. Of cource, if you are provided with a password to the container you can normally just decrypt it and get the data. But you may not have access to any hidden volume there, and might still be wondering if a hidden volume could be present. By using this method, you may be able to say, even without the decryption key, with a little more confidence that;
  • It is likely that a hidden volume can be present in that container.
  • It is not likely that a hidden volume can be found in that container.
  • This chunk of random looking data might be an encrypted container with a filesystem such as NTFS or FAT.
  • Provide a point in time when the content within the encrypted container was modified, even though timestamps within the encrypted volume has been tampered with.
  • The mode of operation used in the encrypting process seems to be XTS and not CBC (or vice versa).
After the last round of playing with bitmaps in http://plainbinary.blogspot.com/2017/08/more-playing-with-veracrypt-and-hybrid.html it quickly became evident that a visual representation of the data in a bmp could become handy. Some more playing and looking at diffs of containers before and after content was modified, it suddenly got a whole lot more interesting. At this point it is appropriate to mention that I started searching for previous research on the topic, and found a few references. First and foremost, the documentation itself, has a warning. See the first bulletpoint at https://www.veracrypt.fr/en/Security%20Requirements%20for%20Hidden%20Volumes.html containing a brief section explanaining the security issue with exposing more than 1 sample of the container from different points in time. And some more significant references relating to this ;

Find a second version of container

Finding a second version may not be easy or possible at all. But some places they can be found in are;
  • Backups or older copies.
  • Left over like in unallocated on the filesystem.
  • Volume shadow copies.

Create the image

For the post I prepared a tool called MakeImage that will transform any piece of binary data into a bmp that can be visually inspected in a proper graphics viewer. Grab the tool at https://github.com/jschicht/MakeImage . The tool will let you specify the width of image. It is hardcoded to use ARGB 32 bits per pixel in the bmp. What we will do is create a bitmap representing the disk, and we need our bitmap to display sector size in width. Since each pixel is 4 bytes, the width must be 512/4=128 pixels (X). Now we have 1 sector from disk per line in the image.  For the bytes to display properly in the image, the bmp is constructed such that the lines over Y are flipped upside down, whereas the the bytes per line on X are preserved in original order. The resulting image may thus be quite large (in heigth), and not all programs will display it properly. This is an example of what we will be dealing with;

That sample is just 4 mb in size and well suited for visual inspection. Not much can be deduced from that file when looking at it with no earlier version to compare with. It just looks like random data.

Produce a diff

Now we will decrypt the volume and store a file in there. Unmount the volume and let MakeImage create another bitmap that we can work on. Then let us compare the images and produce a diff. A very nice and easy and free tool for this diffing task is the compare component from ImageMagick. No need to reinvent the wheel here. Download the package from https://www.imagemagick.org/download/binaries/ImageMagick-7.0.6-7-portable-Q16-x64.zip and use a command like this;

compare image1.bmp image2.bmp diff.bmp

The resulting output file diff.bmp will have flashing red pixels for those that differ over the 2 images.

Identification of filesystem pattern

This is in itself not overly impressive, but merely a nice way of letting us visually analyze the difference. If we were to look at a bunch of numbers, it is sometimes hard to see properly what is there. Especially when dealing with a diff of encrypted bytes, where we don't have concrete things like size and timestamp to relate bytes to. Instead, we are left with the possibility to spot a vague pattern. The identification of such pattern may be programatically solved, but will not be covered here, at least this time. So what kind of pattern is there to spot? Let's first go through briefly how we can produce a diff. Since our pixels are built of 4 bytes we can't be more granular in the visual inspection than saying that 1 or all of these 4 bytes has changed. Turns out that VeraCrypt in the default setting will encrypt blocks of 0x10 bytes. That makes perfect sense as the tool reports a block size of 128 bits;


Which of course is expected; https://www.veracrypt.fr/en/Encryption%20Algorithms.html Therefore our 4 bytes per pixel restriction is not the determining factor for how specific we can be. Said differently, when looking at the diff of the encrypted container, we will see blocks of 4 red pixels where data has changed. If there was a need to be more granular with the diff, we could have used 1 byte per pixel, and used 2048 on width Y.

FAT

We will first investigate both the encrypted diff and then the unencrypted diff, and observe the similarity. This cropped image is from the encrypted diff taken before and after a file was copied into the FAT volume;


The first chunk of red pixels is seen at Y pixel 258 (pixels start at 0). That would mean sector number 259. Remember the VeraCrypt specification that says the standard header is from offset 0 - 0x10000 and the header for the hidden volume from offset 0x10000 - 0x20000. So the 2 headers are located on sector 1 - 256, which means that for the unencrypted volume the first 2 sectors are untouched, and the first modification is within the third sector. Let us take a closer look at the image above. Here is a crop from Y pixel 256 (and zoomed in 400%), which should be the start of the unencrypted volume;


The next thing I did was to produce dd images of both the unencrypted volumes, produce bitmaps of them and then generate a diff. This is the diff of the same region, but cropped from Y pixel 0, since there is no VeraCrypt header in the decrypted volumes;


We can immediately spot the clear similarity. Now let's take a look at what changed on the FAT volume specifically. Short version is that the first 2 chunks are for FAT 1 and FAT 2, while the third is for Root directory. It seems the location of these 3 pieces as well as the blocks between them, will highly depend on the size of the volume, cluster size and FAT version. It may not be possible to conclude on volume size by just looking at the diff. But we may possibly identify FAT 1 and FAT 2 based on their identical change, FAT 1 being close to volume start and their distance apart (in sectors) being in the multiple of 2. Here's some text applied to the encrypted diff.


Even though changes on FAT may not be very clear in pattern, it could still be determined based on elimination. 

Physical location of standard vs hidden volume

Now let's take a step back and create a container with both standard and hidden volume. Same size of 4 mb for the standard (outer) volume and 500 kb for the hidden volume within the standard volume. Then put a file into both the volumes and made a diff. This image is scaled down so it fits within a reasonable window, and servers to illustrate the relative location of the standard vs hidden volume within the container;


No need to show the diff for the standard volume as it is almost identical to the diffs presented above. We will instead look at the diff for the hidden volume. Here's a crop of the hidden part zoomed in;


It clearly has some similarity to the standard volume observation. The main difference is that the hidden volume changes were found towards the end of the container. That's just how it needs to be as it resides within unallocated randomized data, and the further out in the file the hidden volume is placed, the less likely it is to be overwritten. Based on the pattern found and the fact that the changes were found towards end of container, it is likely a hidden volume. If the standard volume was unlocked and the location of changes are mapped to unallocated space within the standard volume, it is very likely the hidden volume.

Identification of pattern for NTFS

The FAT filesystem is less complex than NTFS, and will contain much less activity and diff changes than for NTFS. It might therefore be easier to spot an NTFS pattern than a FAT pattern. But that's up to the judging eye. I have myself more experience with NTFS analysis and will try to show some clear pattern that can be explained. The images are generated from volumes that have either a single file copied or a single file modified. But even then, the chunks of red are significant. There are more changes to NTFS than has been provided in the below images. Take a look at this cropped image part, which is zoomed in 500 %;


As you can see there are some patterns to spot. Some of these are very specific to NTFS. Here's some text applied to the same image part. Let me try to explain the image.


First a brief explanation of the abbreviations;
  • LSN: The $LogFile sequence number in MFT record header. It reflects the last FS transactions that conserned a given file. 
  • USA: Update sequence array. Is the array of bytes that is checked and replace during fixups. Heavily used.
  • SI-TS: $STANDARD_INFORMATION timestamps. These timestamps are 4 x 8 bytes. That is why the red chunk is wider than the others. Few of these timestamps are updated regularly.
  • USN: Update sequence number found in $STANDARD_INFORMATION. Used with UsnJrnl. Think of it as LSN with $LogFile. Updated regularly when UsnJrnl is active.
  • FIXUPS: The 2 bytes at end of sector that are replaced with the value found in USA. Heavily used.
The strongest indicator is probably the column of red on the right side. This is the fixups, that NTFS uses for internal integrity checks in various metafiles including MFT records and INDX's. This 2 byte field is located at the end of each sector. For every remount of the volume these are regenerated, and is why we see this so clearly.

INDX

The first chunk is an INDX. We can deduce that since the height is 8 pixels, and INDX's are 8 sectors in size (4096 bytes) with fixups on each sector. The USA is normally located at offset 0x28 in INDX. That explains why we have 8 unmodified pixels (32 bytes) before it.

$MFT

The presence of $MFT is also fairly easy to spot. The MFT record has a somewhat fixed structure. Of course not all attributes are constant, but the header is always present while $STANDARD_INFORMATION is almost always present. The fixups are also always present. MFT records can be of size 1024 or 4096, though 1024 is the most usual seen. For 1024 byte records it means every second sector will most of the time have little changes. This is because attributes tend to fit within the first 512 bytes of the record for most regular files. This pattern is also very clear, with changes on every second line.

$LogFile

This file is also fairly easy to spot as it is heavily used on Windows.


The RSTR section of the $LogFile will not have much modifications except some values in the header and the restart area as well as the fixups. The RSTR is 2 times 0x1000 bytes, followed by a bunch of RCRD's. The RCRD content is updated frequently which is why you see all the red. All RCRD's have fixups that you can vaguely spot in the large red section.

$TxfLog.blf

Turned out this one had an easy to spot pattern worth mentioning as well;


This feature is rarely used by applications so I would assume that pattern to stay like that. However, if transaction were used, then it would look different. Though, it would still contain fixups, so maybe more in pattern like $LogFile but with less red. It can also be turned completely off during format, in which case it would not be present.

Password changes

What if we changed the password for the encrypted volumes? Turns out the byte changes are reflected identically for both standard and hidden volumes. There will be a complete red line like this;


So the complete sector changed. For a given volume type we will see 2 such lines, though at different offsets.
For the standard volume the offsets (Y pixels) are;
  • 0x0 (Y = 0)
  • EOF - 0x20000 (max of Y - 128)
For the hidden volme the offsets are;
  • 0x10000 (Y = 128)
  • EOF - 0x10000 (max of Y - 256)

Other container types

At this point I got curious what other type of containers would leave for diff. The only other encryption solutions I tried for the test was BestCrypt, ProxyCrypt and Bitlocker. All of them (going with default settings) showed similar behaviour to VeraCrypt on the diffs, with good patterns to spot. So, in the end nothing revolutionary, just block ciphers doing encryption on fixed sized blocks.

Changing Mode of Operation to CBC

This post is already way too long, but I'll throw in a brief comparison of XTS mode (which is covered in above examples) vs CBC mode. In theory it should distroy some of the pattern as the chaining process causes any block to be XOR'ed by the previous blocks ciphertext. The CBC test was done with BestCrypt. Surprisingly the NTFS pattern is still identifyable, but in a less distinct way. Here is how $TxfLog.blf now looks like;


As can be seen, it is still familiar. Now, take a look at this image covering an INDX and $MFT;

Still, the pattern is somewhat visible. Interestingly this could mean that when analyzing such diffs, it could be possible to identify which mode of operations that has been used in the encryption process, at least if you were to choose one of XTS and CBC. I could be off track with this one, but I thought it was an interesting enough observation to share anyway.

Sunday, August 13, 2017

More playing with VeraCrypt and hybrid files

I thought I should expand a bit on the VeraCrypt game started in the previous post http://plainbinary.blogspot.no/2017/07/steganography-with-modified-veracrypt.html

This time I'll focus on the legacy version though. We will investigate what the encrypted container bytes may;

  • Look like in a bmp image.
  • Sound like in wav track.
  • Look like when turned into a raw video format like yuv.
The three examples we will go through are similar to the procedure described in example 4 of the previous blogpost referenced at the top. That is with a method like http://keyj.emphy.de/real-steganography-with-truecrypt/ where the container is a hybrid file that fulfill the structure of another file format and still works as a VeraCrypt container that can be mounted. The hybrid files can thus be managed in multiple ways.

For the examples I whipped together som code to prepare such containers. They can be found in the usual place at https://github.com/jschicht/MakeContainer Look out for those with names having -Legacy appended.

1. Encrypted bytes as a bmp image.


First create the container in VeraCrypt and use hidden volume feature, because we can't really use the standard/normal volume when used in a bmp. The reason for that is because the header is overwritten with the BMP header, and the last few bytes in the file may be bytes filled for alignment purpose. The way VeraCrypt works is that when the original header is invalidated for some reason, there is an option to load backup headers (both standard and hidden) from the last 0x20000 bytes of the file. Now in the case of the bmp trick, both places are tampered with, leaving us with the option to load hidden volume because its header (offset 0x10000 - 0x20000 from start) is still intact. Strictly speaking, it is possible to load the backup headers if you have a tool available that can load the encrypted bytes from a defined offset range and present it like a disk. This is what I explained in previous post when using the aim_ll tool from Arsenal Image Mounter. But forget about that for the moment, as we'll do this exploration from a different angle this time. Next download the tool at https://github.com/jschicht/MakeContainer/tree/master/MakeContainer-Bmp-Legacy and turn the container into a bmp. This is how such an image looks like;


It may come as no surprise that there is no obvious pattern to spot. That is of course an important point with encryption, to produce bytes that can't be distinguished from random bytes. I could mention that the tool will let you specify the pixel width, while the height is automatically created based on the chosen width. The reason for the appended bytes is because a pixel line (width) can't be broken or partial. That is, the smaller width, the less bytes you will possibly have to append. The header will look like a regular bmp header like this;


The encrypted bytes start at offset 0x36. It is worth noting that the way bmp works, is that the original (pixel) bytes are flipped 180 degrees on the X, and then turned upside down. When creating the special containers we obviously can't do that because it would break the VeraCrypt format. We thus need to make the bytes on disk as they are expected by VeraCrypt, but the bytes are distorted visually as interpreted and displayed through the bmp (inverted). But that does not really matter for the view right now as random data will still look like random data on the pixel side regardless of whether it is flipped 180 degress by X or turned upside down.

Mounting the encrypted container fairly easy. Just load the bmp into VeraCrypt and provide the password for the hidden volume.

2. Encrypted bytes as sound in a wav.


Create the container in VeraCrypt. You can use both standard and hidden volume with this file format. Similarly as with bmp, parts of the header is overwritten. Here's what the header may look like;


Fortunately with the wav format, there is no need to align data size. We can therefore use the backup headers for the standard volume. Usage of the hidden volume is just like normal. Go to https://github.com/jschicht/MakeContainer/tree/master/MakeContainer-Wav-Legacy and download the tool. There's an option to configure the number of channels. The tool will then output a ready made and valid wav to be played. At this point you might be wondering what it really sounds like. Here's a sample; https://drive.google.com/file/d/0B1M9FFDeCvMpUVVzOXdZRnRtUmc/view?usp=sharing The password of the standard volume is "joakim". It plays fine in Windows Media Player;


and also in VLC;


In order to mount the standard volume, we must use the backup headers. Configure the mount options like this;


The interesting thing with wav is that you can burn your "sound" compilation onto a CD, and still mount the encrypted container directly from the CD. For that we would need to also turn on the read-only mount option;


As already mentioned you can use both standard and hidden volumes, and since I used the backup headers in the above screenshot, it's because I was mounting the standard volume. As seen in the next screenshot, the sound file plays fine and VeraCrypt can mount the volume too;


3. Encrypted bytes as a raw video file.


First prepare a volume. With this method we also have some restrictions to handle. Due to the way raw video files and yuv in particular are built, is that there is no real header as with most other file formats. You simply need to know what frame size and type the file is expected to be in, and then just pass the parameter to the player. To strictly adhere to the specific encoder it is supposed to be in, the file may need some bytes appended. For this reason, you can use both standard and hidden volumes, in the normal way without using backup headers. In fact, the backup headers may not work at all because of the reason just explained. Get this tool https://github.com/jschicht/MakeContainer/tree/master/MakeContainer-RawVideo-Legacy for the preparation of the container. There you will have the option to specify the XY dimension of the video, and the tool will align file size according to the chosen XY and the rgba or yuva444p format. The output filename will contain the details to play it properly. In order to play the yuv file, there are a few options. For instance;

#1
vlc --demux rawvideo --rawvid-fps 25 --rawvid-width 320 --rawvid-height 240 --rawvid-chroma I420 file_320x240_rgba.yuv

#2
ffplay -f rawvideo -pixel_format rgba -video_size 320x240 -framerate 25 file_320x240_rgba.yuv

#3

When playing with raw video it quickly became evident that these players actually will attempt playing anything you feed it. The video will mostly look like with the bmp sample;


The concept of data hiding is far from new. A few related links worth mentioning;
Lastly I will stress the point that even though the encrypted container is masked within another file format, it is relatively easy to spot that there's something strange about it when you investigate the file. 


Saturday, July 29, 2017

Steganography with a modified VeraCrypt

So VeraCrypt is a great encryption tool. It is open source, has broad OS support, has lots of good features, works generally very good and has been through several security audits (including TrueCrypt) and subsequent bugfixes. Still I always thought it would be fun and interesting to load containers from anywhere on a disk or file by using offset. That way you could challenge your creativity and skills when storing (hiding) the container. There are a number of methods available to achieve that, but the motivation was to make it possible natively in the tool without depending on a mixture of tools for loading and decryption. Linux is slightly easier to play with as for example explained here https://blog.linuxbrujo.net/posts/plausible-deniability-with-luks/ even though it's not exactly a oneliner. The original patch was made for TrueCrypt about 3 years ago, and now recently I decided to apply the patch to the latest VeraCrypt version 1.21 and have a play with it. The source is available at; https://github.com/jschicht/VeraCrypt We will go through some interesting examples of usage with that special version in this post.

Brief description of the patch. A new command line parameter, /i have been introduced. It defaults to 0, but can be overridden with an offset by placing a decimal value like /i 4096. Basically changes were required in order to pass the offset from commandline usermode into the kernelmode driver. This is the reason for the incompatibility with the legacy version mentioned later.

First off, a huge warning. 
This patch is more of a hack than anything else. It is certainly not provided for showing off excellence in programming. It is a PoC and nothing more. It may also have introduced bugs. Do not perform testing on volumes with content you are not ready to loose! But enough about warnings, let's continue.

The earliest references I could find about steganography and hidden containers with TrueCrypt/VeraCrypt was http://keyj.emphy.de/real-steganography-with-truecrypt/ That trick is about creating a hybrid file format and putting the hidden volume part of the header at a fixed offset 0x10000. That would leave 0x10000 bytes to play with for creating a custom file header for a tweaked file format hiding the container. The obvious drawbacks with this are the limited set of file formats that play well with it, the fixed offset and the lack of support for both normal + hidden volume. The appealing thing is the added layer of protection for the encrypted file by hiding it within another file without invalidating its format/structure.

Now moving a step ahead, by supporting any offset for the container, we can get slightly more exotic in our data hiding test. An important thing to keep in mind is that data must always be stored at sector size aligned offset, when using this particular patch. An easy example would be to place some container data in unpartitioned space on the disk. However a more interesting place would be to store it inside something else on the disk. The success in doing so directly relates to how tweakable a file format is, but also depends on how certain files are being used. I will explain 4 different methods. At this point is worth mentioning that I created a package with some tools a few years ago to prepare such hybrid file formats for hiding these encrypted containers;  https://github.com/jschicht/MakeContainer

Preparation procedure

Before we go to the examples, let me explain the procedure for preparing the custom containers.

  1. Run the VeraCrypt wizard and create an encrypted file container, either normal or hidden. Don't put anything inside it yet.
  2. Run any of the mentioned tools to hide the container in some other file. A bat file will be generated with an example command line for loading it later on. This is of cource just a sample file to show the command, and obviously not meant to be placed on the system.
  3. Run the patched VeraCrypt with a command like the one specified in the example bat file that was generated in step 2. Now you will have to format the the volume once more time after it is decrypted. This is because the physical offset changed. When the volume is formatted the second time, it is ready for use. This is the same for both standard and hidden volumes.
  4. Make sure the host file that contains the hidden container does not get modified at the offsets where the container bytes are stored. Static files are of cource safest to use, but it is for instance possible to store the container inside a text based logfile as long as all new log entries are written to EOF and the logfile is not recycled. Please note that VeraCrypt puts a lock on the file, so it the container is hidden in an exe, then you might not be able to execute it if VeraCrypt has mounted it. Mounting an exe that has a process running, might work though.


Example scenarios

1. Inject encrypted container into the authenticode digital signature of an executable.
The funny issue with Authenticode seems first time described here; https://blog.barthe.ph/2009/02/22/change-signed-executable/ and https://blog.didierstevens.com/2009/01/17/playing-with-authenticode-and-md5-collisions/ In essence it is about modifying the Authenticode signature in signed executables.
To speed up the process of container creation, use the tool MakeContainer-Authenticode. The tool injects the container at a sector size aligned offset within the signature. This is how the original VeraCrypt.exe looks with a container injected into the digital signature signed with IDRIX's certificate and mounting it.


Digital signature still ok after we have mounted an encrypted container from within it. During the tests I noticed that Microsoft has put an upper limit of signature size. Anything beyond exactly 100.000 kb (minus 8 byte header) is disregarded from evaluation, leaving the executable file assumed as unsigned.

2. Locked system file.
In this example we will hide an encrypted container inside the hibernation file, hiberfil.sys. With hibernation activated, this file is completely locked by the system. However, reading the raw sectors from disk is still possible, which we will take advantage of. Due to the method used in this example, on nt6.x and later we are restricted to reading from the volume due to https://msdn.microsoft.com/en-us/library/windows/hardware/ff551353(v=vs.85).aspx and VeraCrypt not using SL_FORCE_DIRECT_WRITE as in https://msdn.microsoft.com/en-us/library/windows/hardware/ff549427(v=vs.85).aspx. For this particular reason, as an initial write operation is needed, we need to take some rather unusual steps to place the container where we need it to be. In XP that is not needed as you can write to anywhere. So we need to boot into WinPE, where we can do whatever we want with the disk when the local system is not running. Actually it would be far easier and faster to boot into linux and use dd to write the container, but has we anyway need our Windows only custom VeraCrypt for preparation, we will stick with WinPE. For the test a custom Win10PE SE was used. When booted, we start by opening the disk with WinHex and click on hiberfil.sys to check the sectors.


Pay attention to the "Logical Sector No.: 24964832". Now run the old nfi.exe tool from microsoft to check the blocks. A command like this would do;
nfi.exe c: 24964832


There we find 2 extents consisting of roughly 2 GB and 1 GB. Due to how Windows uses the hibernation file, it is somewhat safe to store some data towards the end of it. In theory this may of course not be bullet proof, but in practice it may work fine. Just don't hibernate the system when it is heavily used and swapping, because that will likely overwrite the portions of the file where our data is stored. We therefore choose the second extent. This will obviously vary from system to system. First we need to check the partition offset. As we are using WinHex anyway, we open PhysicalDrive0.


The partition with system volume is starting on sector 718848. In order to write to the volume we must first unlock the volume. We temporarily wipe the partition type indicator field in the partition table of mbr (in this case offset 0x1D2), and rescan the volumes with the Windows own diskmanagement.msc. Now that volume is unlocked, we can write our container bytes to the offset. For easyness we place it at partition start + the logical sector of the second extent. That becomes sector;

718848 + 22460800 = 23179648

or disk offset;

23179648 x 512 = 11867979776 (0x2C3630000)

The equivalent dd command to write the container to disk would for example have been;

dd if=c:\temp\container.bin of=\\.\PhysicalDrive0 seek=23179648

As described earlier, with this VeraCrypt hack, we need to first launch our custom VeraCrypt and mount the volume, to prepare it, and also write what we need to write while volume is unlocked. The command in this case would be;

VeraCrypt.exe /v "\Device\Harddisk0\DR0" /l t /a /p joakim /i 11867979776

Ok cool, it mounted. Now format the volume and place some files there. I exaggerated a bit and made a 700 MB volume. When done, unmount the volume, redo the wipe we did of FS field in partition table, and lastly rescan the volumes as we did earlier. Now data is prepared and hidden, and we can get out of WinPE and reboot into the local system. When booted, we can attempt to mount our extremely well hidden container. The reason why we chose Harddisk and not Partition or Volume for access, is because Windows would then block VeraCrypt's access attempt. See:


and

We therefore access \\.\PhysicalDrive0 with a command like this;

VeraCrypt.exe /v "\Device\Harddisk0\DR0" /l t /a /p joakim /m ro /i 11867979776

Notice the read-only switch we added compared to the command run earlier. This is how it looks like;


Let us verify with chkdsk that both the system volume and our mounted volume from within hiberfil.sys, is in a healthy state;


This is what the start of second extent of hiberfil.sys now looks like in our hex editor;


It is not possible to tell that these bytes are suspicious, just by looking at it like that. If you were to extract and analyze hiberfil.sys, you probably would not find much. Most tools would fail at parsing a modern hibernation file anyway, and those that can, would not be able to identify anything unusual. The only exception here is Hibernation Recon, https://arsenalrecon.com/apps/hibernation-recon/ which processes the file much more thoroughly and can differentiate real hibernation data and data that is not. However it can't spoon feed you with a "hey watch out for offset blabla because there is an encrypted container there!". The VM this test was performed in, was thus running on HDD. For systemdrives on SSD this particular trick with hiberfil.sys would not work, and you should choose another file.

3. Bitmap + Portable Executable.
Let's modify an executable (exe), and inject a container as a custom resource in the resource section. We will create another custom prepared bitmap first, that we will inject into the exe. For the bitmap, we use MakeContainer-Bmp, for storing the container inside the bitmap. Verify that the bitmap is fine afterwords. Then we use MakeContainer-PEResource to inject our custom bitmap into an exe. I took 7zFM.exe from 7zip package. Since we double hid the container we need to add the offset provided from MakeContainer-Bmp and the offset provided from MakeContainer-PEResource to the get the real offset for VeraCrypt.


The raw offset of 0xC480C (see Stud_PE) for the injected bitmap is just for the program to behave well. The bitmaps real offset is found at 0xC4A00 (see WinHex) after being aligned to an offset at sector size, and random data filled in between.

4. Text based log files and legacy version.
Lastly we will look at an example similar to what Martin Fiedler did with an mp4 video file (referenced at the top), but with a simple text based log file found in %TEMP%. Not going into all the details, as Martin did that perfectly in 2011. Be sure the container has a hidden volume. There are many files in %TEMP%, so I just chose dd_vcredistMSI27A3.txt out of random. Chop off the first 0x10000 bytes from container and copy the rest over to the log file and write it at offset 0x10000. That's it. No need to run the hacked VeraCrypt version. But you need to mount the file using the hidden volumes password. When opening the file in a text editor, it looks alright until offset 0x10000.


The 4 examples was hopefully bringing some entertainment along when showing some of the potential that VeraCrypt has got when introducing offset to the game.

Some limitations to be aware of.

  • The patched version is currently Windows only. I have attempted a linux patch, but without luck so far.
  • Only available on commandline.
  • Only mount operations work using offset.
  • The container used with this special version are not compatible with legacy VeraCrypt version.
  • The binaries from this special version are incompatible with the legacy version. So using the exe from this version and the driver from the legacy version does not work. You can have it on the same system, but in portable mode.
  • The drivers are signed with a test certificate, meaning you need to configure TESIGNING ON in BCD when using 64-bit Windows. For 32-bit OS it just works as is because that requirement for signed drivers are not present.
  • And there could be more that I am currently not aware of.


For those still reading, here's the bonus part.
Fortunately, the makers of Hibernation Recon as mentioned above, also provide another excellent tool called Arsenal Image Mounter which is found at https://github.com/ArsenalRecon/Arsenal-Image-Mounter. Inside the package there's a little tool called aim_ll.exe that expose the advanced configurations, and in particular we are interested in offset and size. The short version of this part is that we can achieve the same as above by loading a physical disk from an offset in a file, and then use VeraCrypt legacy version to handle it as a harddisk device with full disk encryption. Let us redo example 1 with this method;

#1
Create an empty file of approximately 10 mb in size;
fsutil file createnew %CD%\10mb.bin 10240000

#2
Run MakeContainer-Authenticode. Choose an exe with a signature and attach the 10mb.bin file. Pay attention to the output file generated where the offset is specified. Let's say offset=5598208.

#3
Calculate the size parameter to be used in aim_ll.exe;
Size = 10240000/512 = 20000 blocks (of 512 bytes)

#4
Mount the disk;
aim_ll.exe -a -t file -b 5598208 -s 20000b -f VeraCrypt.exe.D6C5.exe
Look at the device generated in the output.


#5
Finally run VeraCrypt legacy version and create volume with the method "Encrypt a non-system partition/drive". We can create either Standard or Hidden volume. At the selection of device make sure to select the correct one as seen in output of  #4. Select "Create encrypted volume and format it", and continue wizard by setting the password.

#6
Mount the volume by selecting device, choosing the correct one, setting the password and that's it.


It is worth mentioning that ProxyCrypt found at https://sourceforge.net/projects/proxycrypt/ may support offset and size. However it has not been part of the test.